Do you ever organize events such as webinars, training courses or a trade fair? Then use our Event campaign as the basis for all communication around your event. Think of sending reminders and surveys. The standard Event campaign is based on one event on a fixed date. Do you have multiple events? The campaign is easy to reuse for new data.
Getting started
Spotler Mail+ has a standard template for an Event. You can always expand or adjust the campaign flow as desired. The campaign flow of the template event looks like this:
Goal = Automate mailings and also all mailings around an event in one overview
Trigger = Fixed date
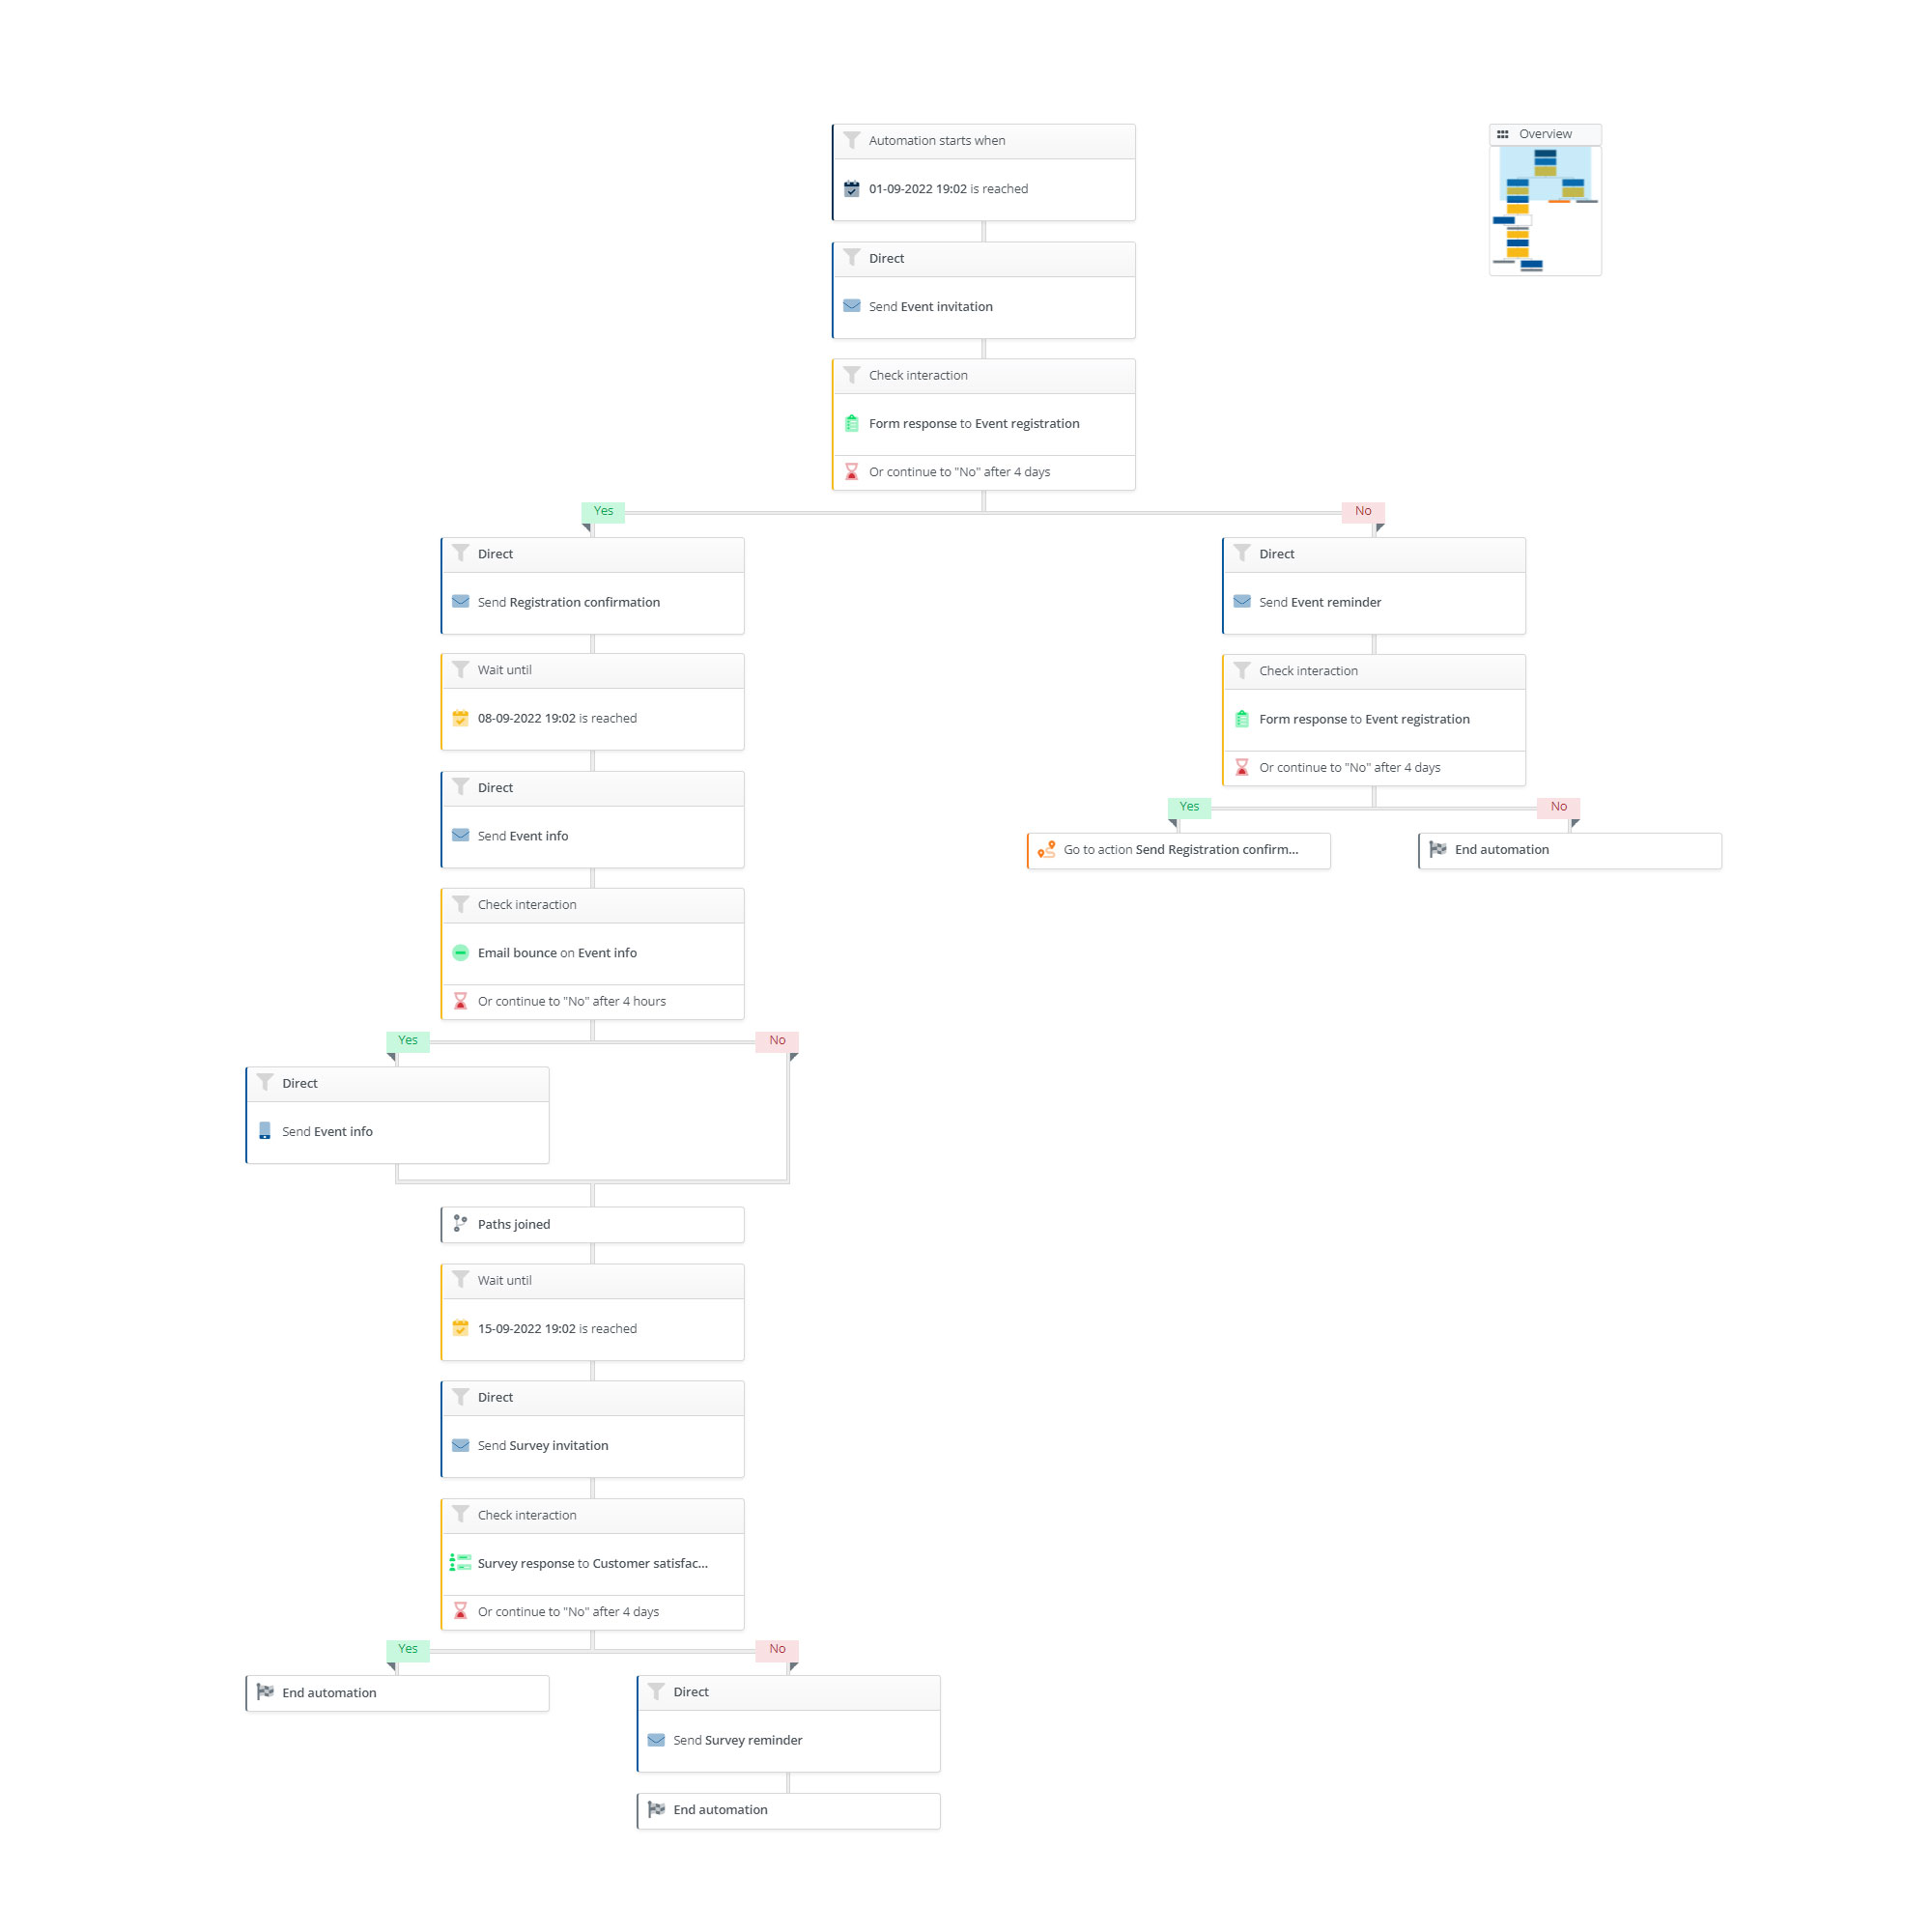
Campaign = An invitation will be sent containing a link to an event registration form. Non-subscribers will receive a reminder.
If someone fills in the registration form, they will immediately receive a confirmation with more information about the event. More detailed information about the event will then be sent on a fixed date. Does an email address bounce? Then an SMS message is sent with event information.
After the event, participants receive a customer satisfaction survey. If this is not completed, the participant will receive a reminder.
You go through the following steps when you use our standard template:
You use the following modules for this:
1. Compose form
For this campaign you need one form, namely a registration form:
- Event registration
Also include the mobile number field in the form. Since in this campaign SMS messages are sent. Want to know more about creating forms? Read the article: New form.
2. Compose survey
In addition to a form, you also need a survey. You want to know from your visitors how they experienced the event. Please note that this survey will be sent to all applicants, including no-shows.
- Survey Customer Satisfaction
Would you like to know more about creating surveys? Read the article: New survey. You put a survey on a web page within Spotler Mail+.
3. Compose messages
For this campaign you compose seven messages, one of which is a text message.
-
Event invitation
You send an invitation with a link to the registration form for the event. -
Event reminder
Use message one, but emphasize the urgency with a deadline for registration. -
Registration confirmation
After registering for the event, the applicant will receive a confirmation. -
Event info
Everyone who has registered will receive more detailed information about the event on a fixed date. -
SMS event info
Is an email address bouncing and do you have a mobile number? Then you can send the person a text message. You compose an SMS message in the Messages module. In step 1, choose message type: SMS. In this SMS, also tell the contact how they will pass on a new e-mail address. -
Survey invitation
You are curious about what visitors think of your event. Send them an invitation with a link to the survey. -
Survey reminder
You want to collect as many reactions as possible from your visitors. A reminder can give them an extra push to complete the survey.
Do not forget to give these messages the status Final, otherwise they cannot be selected in your automatic campaign.
4. New automation
You go through the following steps in the Automations module:
- Click on the yellow button New automation
- In step 1 you enter a name in the Properties, for example; Event {event date}.
- In step 2 you choose whether you want to make a choice from the default templates or a template that you have saved. By default, the choice is on Default templates. Click the Event template and click Save & Next.
- In step 3, click on the blue Edit button to open the editor.
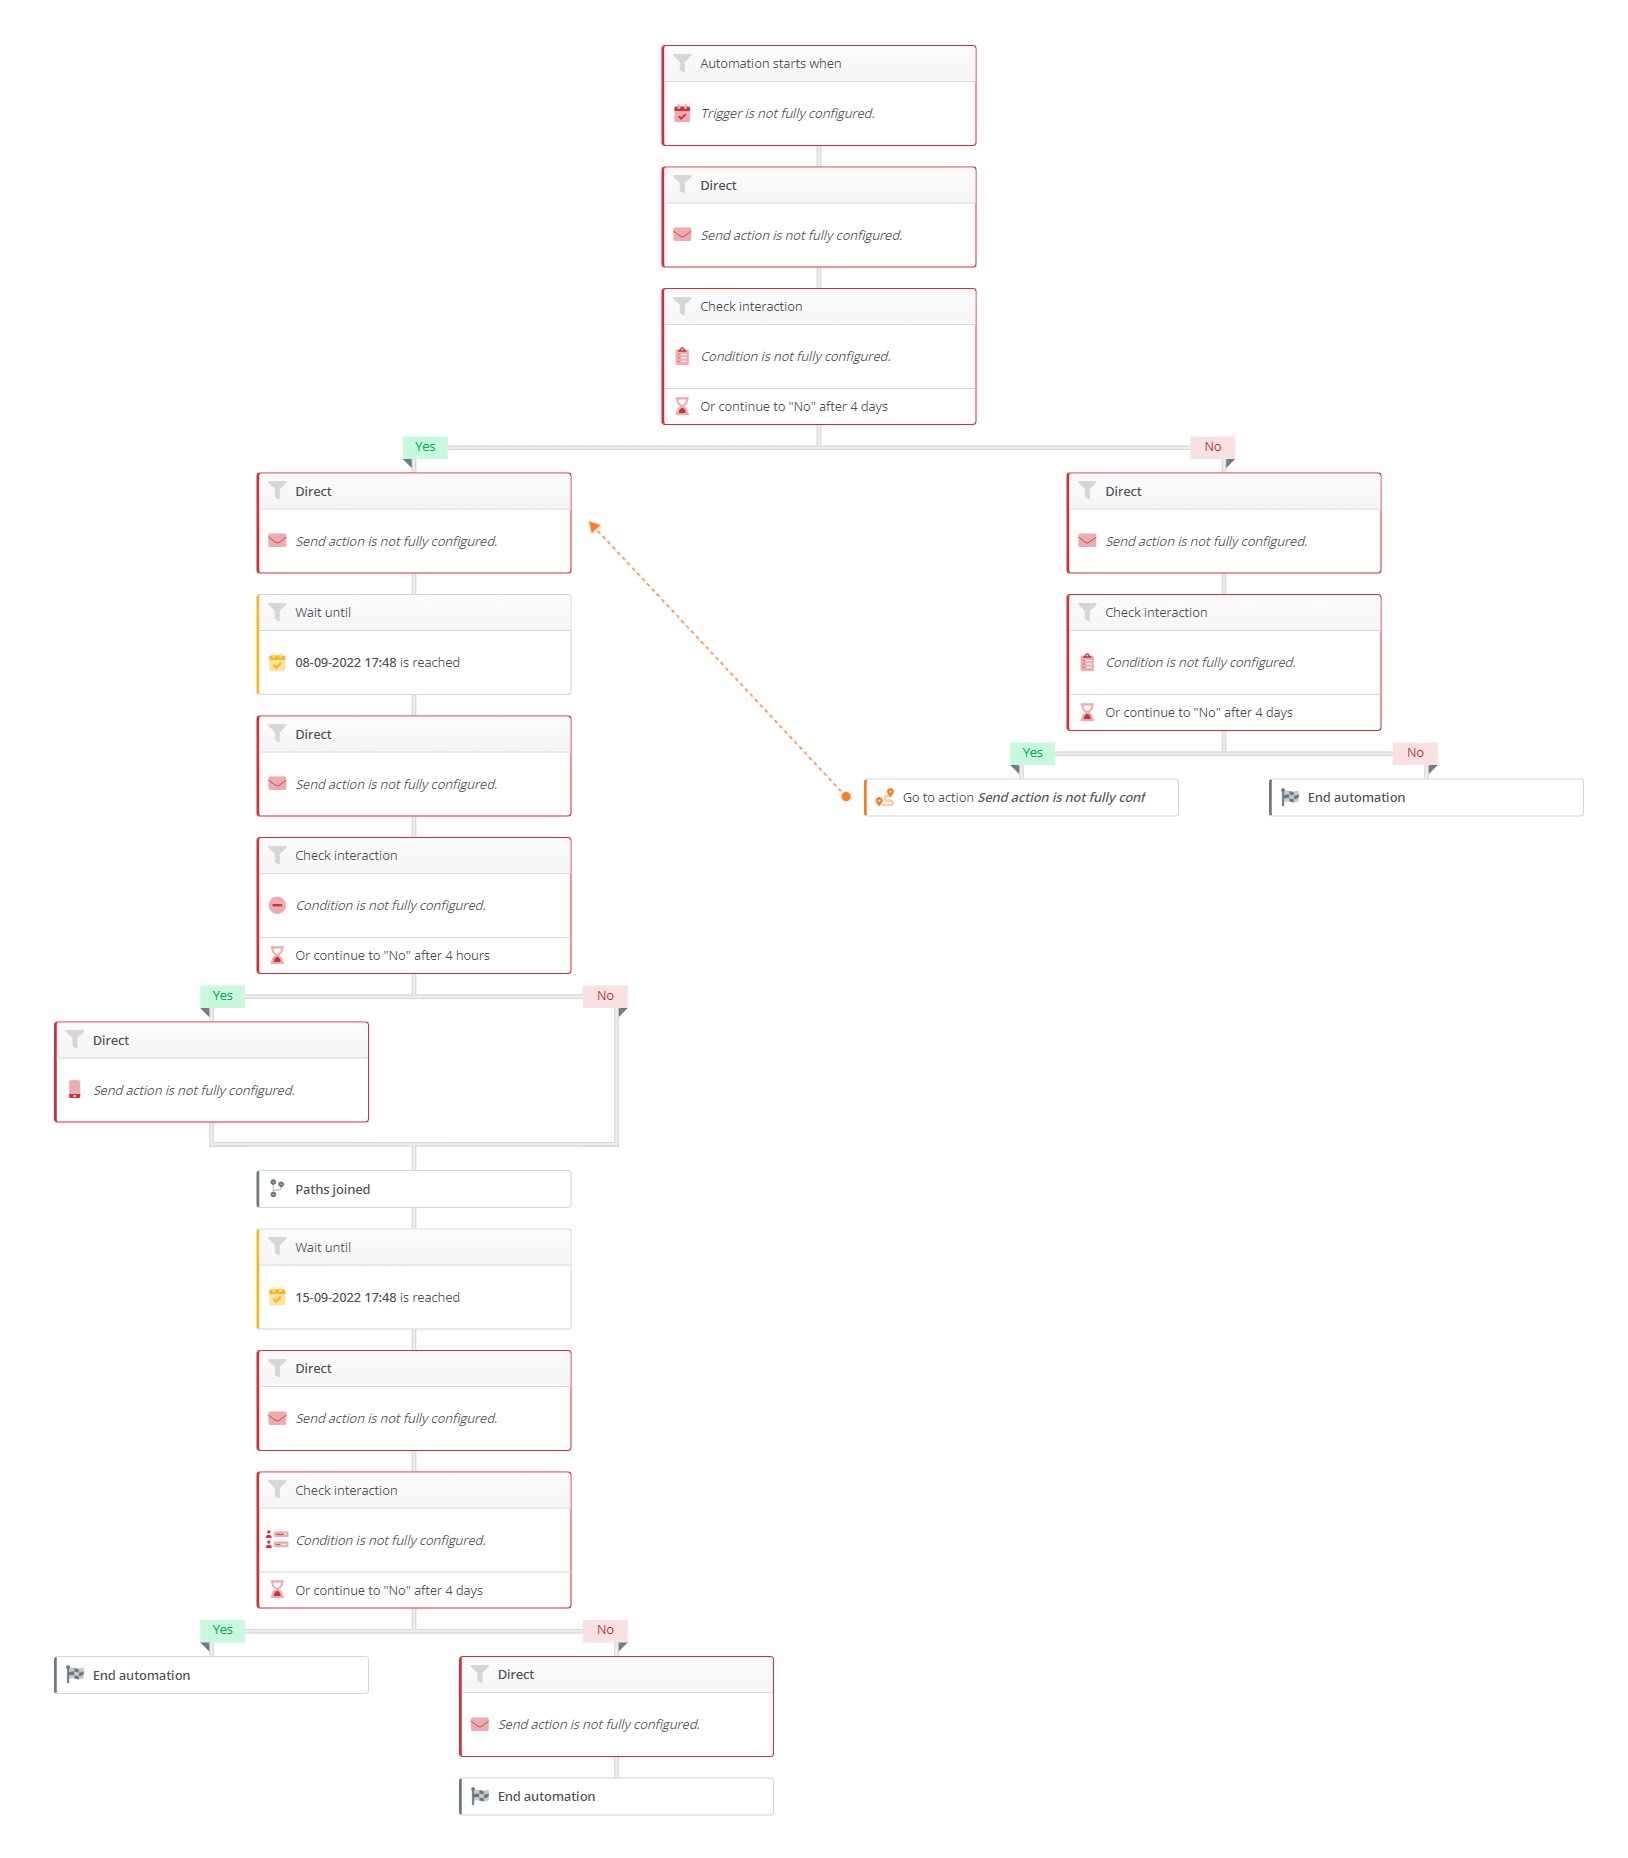
- The campaign flow looks like this in the editor:
The trigger:
Fixed date. Think about how far in advance you want to send the invitation, and enter that date as a trigger. For example 2 weeks in advance, but this may also be longer. In this campaign it is mandatory to set a filter on the trigger, because you can only email contacts about an event if they have given permission on your mailings.
Permission required for the campaign
This campaign may only be triggered for contacts who have given you an opt-in. By applying filters within your campaign, you ensure that only contacts with the newsletter permission are triggered in the campaign.In addition, you also determine in the filter which criteria a contact must meet in order to receive the invitation to the event. You can read how to do this in the article: How do I apply a filter to a trigger, action or condition?
Action
You send an invitation to your contacts with a link to the registration form. You will see that the Send action is not yet fully set up. The correct message has not yet been selected. Click on the send action and then you can select the message on the left that you created earlier, namely; Event invitation.
Condition
During 4 days after the invitation email has been sent, a check is made on the form response of the form: Event registration. There is a yes-path and a no-path.
No-path
There are no clicks 4 days after the invitation? Then the message: Event reminder will be sent immediately. You still have to select this message in the Send action.
Condition no-path
After the reminder, it is again checked for 4 days whether someone completes the registration form. You still have to set this interaction on the correct form, namely; Event registration. If someone fills in the form, they will follow the Yes path on the left, just like all other contacts. Check if the timing of 4 days makes sense for your campaign. It is most convenient to extend these days up to and including the day of the registration deadline for the event.
Yes-path
Will the Event registration form be completed? Then a confirmation will be sent immediately with event information. You will see that the Send action is not yet fully set up. The correct message has not yet been selected. Click on the send action and select the correct message on the left, namely; Registration confirmation
Action
Detailed event information will be sent on a fixed date (to be determined by yourself). You still have to set this send action yourself. Click on the Send action and select the message: Event info.
Condition
A check will be made within 4 hours of the message to see if the email address bounces. The interaction is not yet fully set up. You must select the message where the bounce check is done. In this case: Event info.
Action
Is there no bounce? Then the contact continues the path. Is there a bounce? The contact receives a text message. You must set the Send action to the text message you have created. Select the message: SMS event info.
Action
All contacts will receive an invitation for a survey after the event. You will see that the Send action is not yet fully set up. The correct message has not yet been selected. Click on the send action and then you can select the message on the left that you created earlier, namely; Invitation survey.
Condition
A final condition is the check whether the survey has been completed. This will be checked for 4 days after the invitation. The condition is not yet fully set. Select the appropriate survey for the condition. In this example: Survey Customer Satisfaction.
Action
If this is completed within 4 days, the campaign will stop. If this is not completed within 4 days, a reminder will be sent for completing the survey. The Send action is not yet fully set up. Click on the send action and select the message: Survey reminder.
5. Automation publiceren
To activate the automatic campaign, publish it in the Publisher. You can read more about this in the article: Publisher.

